カテゴリー: PC

  • Vultr / WebARENA 最安プランで UnixBench 比較

    いくら軽量化した Linux といえど、最近はメモリ 512MB では物足りなく感じることも増えてきたので、料金ほぼそのままにメモリが倍である WebARENA への引越を検討したのがこの記事のきっかけです。

    Vultr は Cloud Compute $3.5 のインスタンスで Debian 9.8, WebARENA は VPS クラウド 360円のインスタンスで Ubuntu 18.04 です。どちらも CPU の割当ては 1 コアです。メモリは Vultr が 512MB で WebARENA は 1024MB なので倍違います。

    UnixBench の実行

    $ sudo apt update
    $ sudo apt install gcc make perl
    $ curl -O https://storage.googleapis.com/google-code-archive-downloads/v2/code.google.com/byte-unixbench/UnixBench5.1.3.tgz
    $ tar xvzf UnixBench5.1.3.tgz
    $ cd UnixBench
    $ ./Run

    Vultr $3.5

    BYTE UNIX Benchmarks (Version 5.1.3)
    System: dev.kuratsuki.net: GNU/Linux
    OS: GNU/Linux -- 4.9.0-8-amd64 -- #1 SMP Debian 4.9.110-3+deb9u6 (2018-10-08)
    Machine: x86_64 (unknown)
    Language: en_US.utf8 (charmap="UTF-8", collate="UTF-8")
    CPU 0: Virtual CPU a7769a6388d5 (4788.9 bogomips)
    x86-64, MMX, Physical Address Ext, SYSENTER/SYSEXIT, SYSCALL/SYSRET
    14:45:02 up 122 days, 7:32, 1 user, load average: 0.11, 0.04, 0.01; runlev el

    Benchmark Run: Sat Mar 16 2019 14:45:02 - 15:13:06
    1 CPU in system; running 1 parallel copy of tests
    Dhrystone 2 using register variables 23742739.1 lps (10.0 s, 7 samples)
    Double-Precision Whetstone 4097.1 MWIPS (10.0 s, 7 samples)
    Execl Throughput 3088.4 lps (29.9 s, 2 samples)
    File Copy 1024 bufsize 2000 maxblocks 544312.7 KBps (30.0 s, 2 samples)
    File Copy 256 bufsize 500 maxblocks 154755.4 KBps (30.0 s, 2 samples)
    File Copy 4096 bufsize 8000 maxblocks 1057265.1 KBps (30.0 s, 2 samples)
    Pipe Throughput 885230.4 lps (10.0 s, 7 samples)
    Pipe-based Context Switching 109034.4 lps (10.0 s, 7 samples)
    Process Creation 7718.8 lps (30.0 s, 2 samples)
    Shell Scripts (1 concurrent) 5671.4 lpm (60.0 s, 2 samples)
    Shell Scripts (8 concurrent) 733.8 lpm (60.0 s, 2 samples)
    System Call Overhead 655215.1 lps (10.0 s, 7 samples)
    System Benchmarks Index Values BASELINE RESULT INDEX
    Dhrystone 2 using register variables 116700.0 23742739.1 2034.5
    Double-Precision Whetstone 55.0 4097.1 744.9
    Execl Throughput 43.0 3088.4 718.2
    File Copy 1024 bufsize 2000 maxblocks 3960.0 544312.7 1374.5
    File Copy 256 bufsize 500 maxblocks 1655.0 154755.4 935.1
    File Copy 4096 bufsize 8000 maxblocks 5800.0 1057265.1 1822.9
    Pipe Throughput 12440.0 885230.4 711.6
    Pipe-based Context Switching 4000.0 109034.4 272.6
    Process Creation 126.0 7718.8 612.6
    Shell Scripts (1 concurrent) 42.4 5671.4 1337.6
    Shell Scripts (8 concurrent) 6.0 733.8 1223.0
    System Call Overhead 15000.0 655215.1 436.8
    ========
    System Benchmarks Index Score 880.3

    WebARENA 360円

    BYTE UNIX Benchmarks (Version 5.1.3)
    System: 6v1ct8z4: GNU/Linux
    OS: GNU/Linux -- 4.15.0-20-generic -- #21-Ubuntu SMP Tue Apr 24 06:16:15 UTC 2018
    Machine: x86_64 (x86_64)
    Language: en_US.utf8 (charmap="UTF-8", collate="UTF-8")
    CPU 0: Intel Xeon E312xx (Sandy Bridge) (4400.0 bogomips)
    x86-64, MMX, Physical Address Ext, SYSENTER/SYSEXIT, SYSCALL/SYSRET
    14:43:30 up 33 min, 1 user, load average: 0.23, 0.33, 0.28; runlevel 5

    Benchmark Run: Sat Mar 16 2019 14:43:30 - 15:11:36
    1 CPU in system; running 1 parallel copy of tests
    Dhrystone 2 using register variables 25630360.2 lps (10.0 s, 7 samples)
    Double-Precision Whetstone 4104.1 MWIPS (9.9 s, 7 samples)
    Execl Throughput 2701.9 lps (30.0 s, 2 samples)
    File Copy 1024 bufsize 2000 maxblocks 238080.4 KBps (30.0 s, 2 samples)
    File Copy 256 bufsize 500 maxblocks 63125.8 KBps (30.0 s, 2 samples)
    File Copy 4096 bufsize 8000 maxblocks 737936.9 KBps (30.0 s, 2 samples)
    Pipe Throughput 301805.1 lps (10.0 s, 7 samples)
    Pipe-based Context Switching 82337.4 lps (10.0 s, 7 samples)
    Process Creation 7315.9 lps (30.0 s, 2 samples)
    Shell Scripts (1 concurrent) 5463.5 lpm (60.0 s, 2 samples)
    Shell Scripts (8 concurrent) 719.2 lpm (60.0 s, 2 samples)
    System Call Overhead 253811.9 lps (10.0 s, 7 samples)
    System Benchmarks Index Values BASELINE RESULT INDEX
    Dhrystone 2 using register variables 116700.0 25630360.2 2196.3
    Double-Precision Whetstone 55.0 4104.1 746.2
    Execl Throughput 43.0 2701.9 628.4
    File Copy 1024 bufsize 2000 maxblocks 3960.0 238080.4 601.2
    File Copy 256 bufsize 500 maxblocks 1655.0 63125.8 381.4
    File Copy 4096 bufsize 8000 maxblocks 5800.0 737936.9 1272.3
    Pipe Throughput 12440.0 301805.1 242.6
    Pipe-based Context Switching 4000.0 82337.4 205.8
    Process Creation 126.0 7315.9 580.6
    Shell Scripts (1 concurrent) 42.4 5463.5 1288.6
    Shell Scripts (8 concurrent) 6.0 719.2 1198.6
    System Call Overhead 15000.0 253811.9 169.2
    ========
    System Benchmarks Index Score 602.3

    結果の比較

    項目VultrWebARENAVultr 基準
    Dhrystone 2 using register variables23742739.125630360.2108.0%
    Double-Precision Whetstone4097.14104.1100.2%
    Execl Throughput3088.42701.987.5%
    File Copy 1024 bufsize 2000 maxblocks544312.7238080.443.7%
    File Copy 256 bufsize 500 maxblocks154755.463125.840.8%
    File Copy 4096 bufsize 8000 maxblocks1057265.1737936.969.8%
    Pipe Throughput885230.4301805.134.1%
    Pipe-based Context Switching109034.482337.475.5%
    Process Creation7718.87315.994.8%
    Shell Scripts (1 concurrent)5671.45463.596.3%
    Shell Scripts (8 concurrent)733.8719.298.0%
    System Call Overhead655215.1253811.938.7%
    System Benchmarks Index Score880.3602.368.4%

    Vultr を基準として見ると、全体的にかなりの性能劣化となりました。メモリ量をとるか処理速度をとるか、悩ましいところです。

  • WebARENA VPS クラウド上の Ubuntu 18.04 でログイン(初期接続)できない

    WebARENA VPS クラウド上の Ubuntu 18.04 でログイン(初期接続)できない

    CentOS は root, Ubuntu は ubuntu でログインします。ページによっては root としか書かれていないので混乱します。

    OSroot ユーザ名
    CentOSroot
    Ubuntuubuntu

    キーペアの作成時、公開鍵に指定するのは ~/.ssh/authorized_keys に記載された ssh-rsa から始る行、丸ごとです。

    $ cat ~/.ssh/authorized_keys
    ssh-rsa AAAA.....(snipped).....8GL5qxX

    Ubuntu での root パスワードはホスト名そのものです。SSH でログインした時に表示されるホスト名、またはコントロールパネルでインスタンス名を確認して先頭の “i-” を除いたものになります。

    参考

  • Debian 9 Stretch で unattended-upgrades による自動更新

    Debian 9 Stretch で unattended-upgrades による自動更新

    apt update & upgrade は日常的に実行するものですが、忙しかったりすると疎かになりがちです。そこで unattended-upgrades を有効にしておくことで、j自動で更新を行えます。

    インストール

    $ sudo apt install unattended-upgrades
    Reading package lists… Done
    Building dependency tree
    Reading state information… Done
    Suggested packages:
    bsd-mailx needrestart
    The following NEW packages will be installed:
    unattended-upgrades
    0 upgraded, 1 newly installed, 0 to remove and 1 not upgraded.
    Need to get 61.7 kB of archives.
    After this operation, 252 kB of additional disk space will be used.
    Get:1 http://http.us.debian.org/debian stretch/main amd64 unattended-upgrades all 0.93.1+nmu1 [61.7 kB]
    Fetched 61.7 kB in 0s (82.8 kB/s)
    Preconfiguring packages …
    Selecting previously unselected package unattended-upgrades.
    (Reading database … 38885 files and directories currently installed.)
    Preparing to unpack …/unattended-upgrades_0.93.1+nmu1_all.deb …
    Unpacking unattended-upgrades (0.93.1+nmu1) …
    Processing triggers for systemd (232-25+deb9u6) …
    Setting up unattended-upgrades (0.93.1+nmu1) …
    Processing triggers for man-db (2.7.6.1-2) …

    インストール後に dpkg-reconfigure で有効化します。

    有効化

    $ sudo dpkg-reconfigure unattended-upgrades
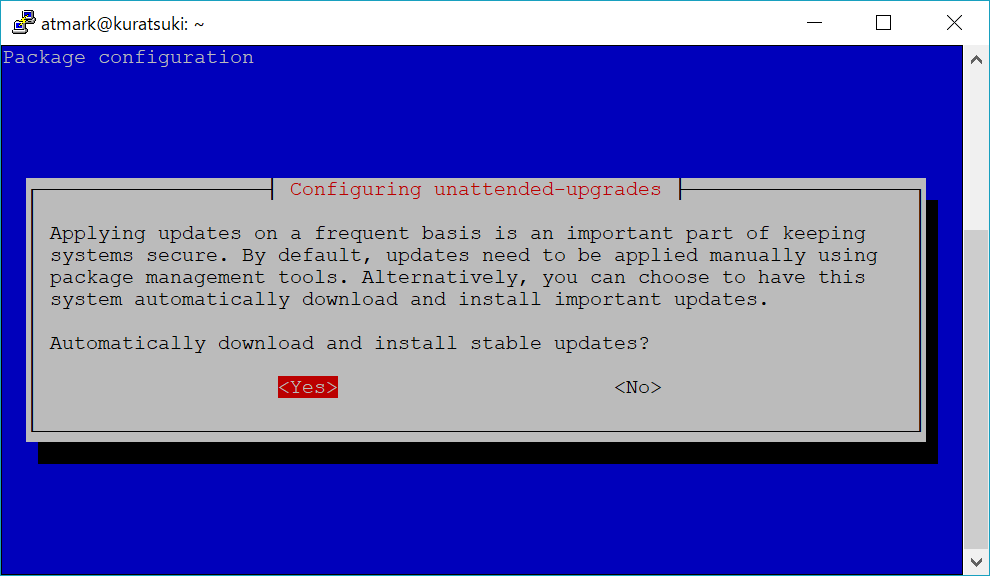
    dpkg-reconfigure unattended-upgrades 1/2
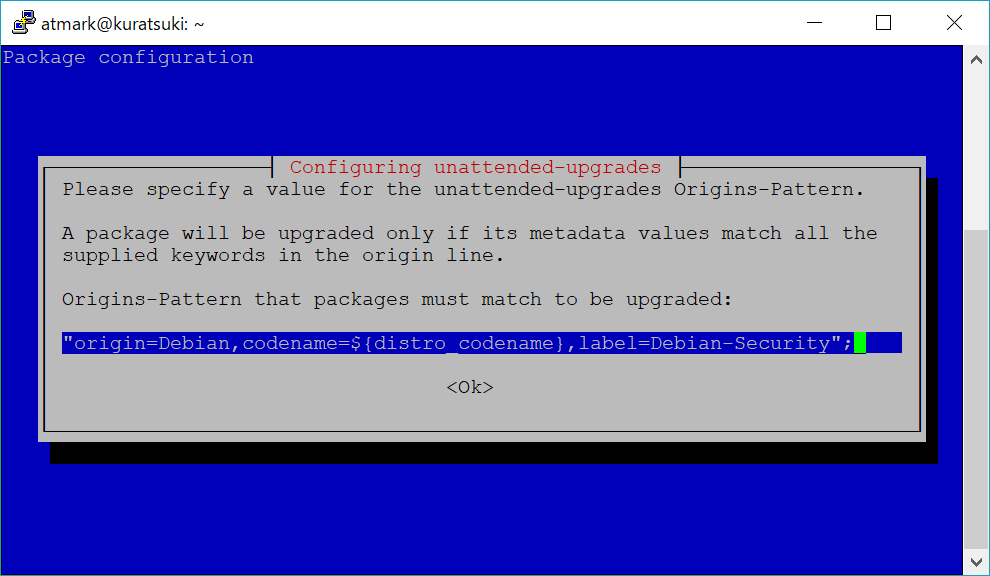
    dpkg-reconfigure unattended-upgrades 2/2

    自動更新の対象とするパッケージの指定です。

    autoremove の設定

    /etc/apt/apt.conf.d/50unattended-upgrades を編集し、不要になったパッケージの削除を有効にします。

    // ...略...

    Unattended-Upgrade::Remove-Unused-Dependencies "true";

    // ...略...

    /etc/apt/apt.conf.d/20auto-upgrades に以下を追記し、autoremove の実行間隔を設定します。

    APT::Periodic::AutocleanInterval "1";

    ここの単位は「日」ですので、”1″ であれば 1 日毎に実行、”0″ なら無効になります。

    // Do “apt-get autoclean” every n-days (0=disable)
    APT::Periodic::AutocleanInterval “21”;

    UnattendedUpgrades – Debian Wiki

    メール通知

    mailx コマンドでメールが送れることを確認しておきましょう。

    $ sudo apt install mailutils

    /etc/apt/apt.conf.d/50unattended-upgrades を編集し、 次の一行を編集して有効にします。

    Unattended-Upgrade::Mail "[email protected]";

    エラーの時のみメール通知する場合は、次の一行も編集します。

    Unattended-Upgrade::MailOnlyOnError "true";

    動作確認

    root で unattended-upgrades を実行すれば実際の動作を確認できます。-d(–debug) オプションを付けると処理内容を表示してくれます。

    $ sudo unattended-upgrade -d
    Initial blacklisted packages:
    Initial whitelisted packages:
    Starting unattended upgrades script
    Allowed origins are: ['origin=Debian,codename=stretch']
    pkgs that look like they should be upgraded:
    Fetched 0 B in 0s (0 B/s)
    fetch.run() result: 0
    blacklist: []
    whitelist: []
    No packages found that can be upgraded unattended and no pending auto-removals

    参考

  • OpenVPN でクライアント接続時にスクリプト実行

    OpenVPN でクライアント接続時にスクリプト実行

    /etc/openvpn/server.conf 内に以下の行を追加します。

    script-security 2
    client-connect /path/to/script-con.sh

    script-security 2 は外部スクリプトを実行するために必要です。デフォルトは 1 です。

    0 — Strictly no calling of external programs. 
    1 — (Default) Only call built-in executables such as ifconfig, ip, route, or netsh. 
    2 — Allow calling of built-in executables and user-defined scripts. 
    3 — Allow passwords to be passed to scripts via environmental variables (potentially unsafe).

    OpenVPN man page

    client-connect にはクライアントの接続時に実行するスクリプトを指定します。実行権限を与えるのを忘れないように。 client-disconnect で切断時に実行するスクリプトを指定できます。

    スクリプト内には定義された環境変数を使えます。全ての環境変数は man page の “Environmental Variables” 節に記載されています。

    今回はシェルスクリプト内から更に Python スクリプトを呼び出してメールを送るという二段ロケットな形を採りましたが、問題なく実行されました。簡単な例を記載しておきます。

    #!/bin/sh
    /usr/bin/env python3 /path/to/python-script.py $common_name $trusted_ip
    #!/usr/bin/env python3
    # coding: utf-8
    
    import sys
    
    args = sys.argv
    
    # Send messages to server admins
    ...

    参考

  • Vultr Cloud Compute(VC2) で swap を設定する

    Vultr Cloud Compute(VC2) で swap を設定する

    Vultr の VPS こと Vultr Cloud Compute(VC2) の標準提供イメージでは、swap の設定がされていません。CPU やディスクの性能的には最安の $3.5/month のプランでも十分事足りますが、メモリが 512MB しかないために簡易なサーバ用途でもギリギリになりがちです。

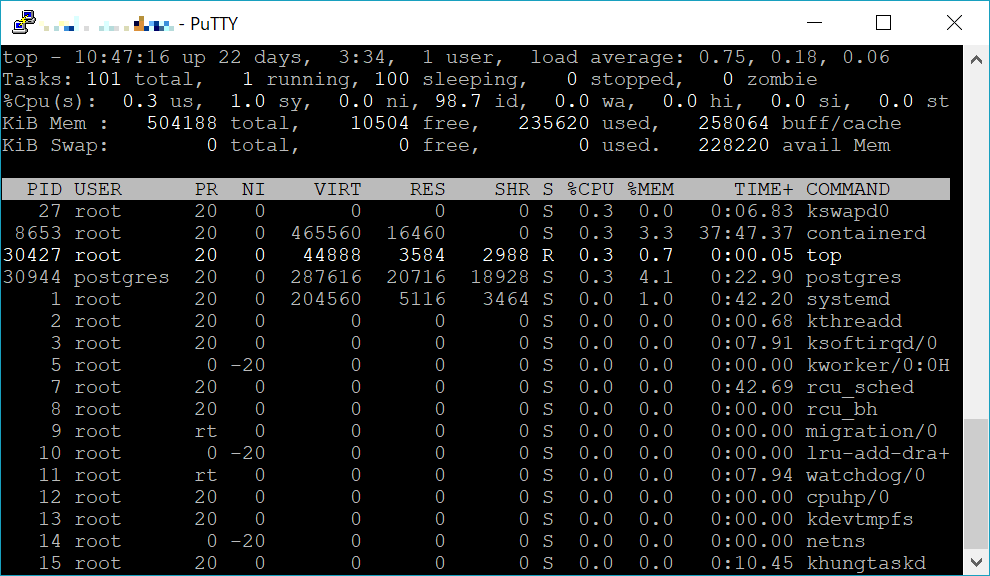
    top

    これは実際に運用しているサーバで top した様子です。メモリの free が 10MB 程度しかありません。250MB はキャッシュなので実際には不足しているわけではありませんが、余裕はない状態です。Vultr 公式に swap の設定ガイドがあるので、これを参考に swap の設定を行います。

    まずは既に swap が設定されていないかを確認します。”free -m” して swap が 0 であることを確認します。

    $ free -m
    total used free shared buff/cache available
    Mem: 492 228 8 26 255 224
    Swap: 0 0 0

    次に swap 先のファイルを準備します。今回はガイド通りの 2GB の領域を確保しました。

    $ sudo dd if=/dev/zero of=/swapfile count=2048 bs=1M
    2048+0 records in
    2048+0 records out
    2147483648 bytes (2.1 GB, 2.0 GiB) copied, 6.51387 s, 330 MB/s

    作成した /swapfile の権限を、root のみが読み書きできるように変更します。

    $ sudo chmod 600 /swapfile

    mkswap を実行して /swapfile のセットアップを行います。

    $ sudo mkswap /swapfile
    Setting up swapspace version 1, size = 2 GiB (2147479552 bytes)
    no label, UUID=0e842c1b-20d4-4da0-853d-78b708da7003

    swapon で swap を有効化します。

    $ sudo swapon /swapfile

    特に何も表示されなければ成功です。”free -m” してメモリ使用量を見てみましょう。

    $ free -m
    total used free shared buff/cache available
    Mem: 492 229 7 26 255 223
    Swap: 2047 0 2047

    すぐには使われないようですが、ちゃんと Swap の total が 0 ではなくなっていますね。

    永続化

    このままだと再起動するたびに swapon しないといけないので、/etc/fstab に書いて起動時に自動で swap を設定するようにします。次の 1 行を追記してください。

    /swapfile none swap sw 0 0

    参考

  • PostgreSQL 9.6 で “Peer authentication failed”

    PostgreSQL 9.6 で “Peer authentication failed”

    既に出尽くした感はありますが、昔からの PC ユーザほどハマりやすいのではないかと思うので記録します。

    データベースへ接続する際の認証手段は「ユーザ」と「パスワード」であると思い込みがちですが、最近の RDBMS では OS 側のユーザで認証するのがデフォルトになっています。

    例えば Linux で foo というユーザでログインしていたとします。ユーザを指定せずに mysql や psql を起動すると、同じ foo というユーザでデータベースに接続します。これはこれで簡潔でわかりやすい仕組みなのですが、落とし穴があって Linux 側と RDBMS が同じユーザでないといけない制限が掛かっていたりします。

    どういうことかというと、例えば PostgreSQL 9.6 を使っている環境で、ユーザ foo さんが psql をユーザ postgres で使いたいとき、次のようにユーザを指定して接続しても認証で弾かれます。パスワードが正しくても弾かれるので、ハマりやすいポイントです。

    foo@host:~$ psql -U postgres
    psql: FATAL: Peer authentication failed for user "postgres"

    postgres で psql に入るには sudo su – postgres などとして、Linux 側でもユーザ postgres である必要があります。

    foo@host:~$ sudo su - postgres
    postgres@host:~$ psql
    psql (11.1 (Debian 11.1-1.pgdg90+1), server 9.6.10)
    Type "help" for help.

    postgres=#

    この認証の設定は /etc/postgresql/9.6/main/pg_hba.conf にあります。hba は Host Based Authentication の略のようです。

    pg_hba.conf

    pg_hba.conf を開くと、説明のコメントがほとんどを占めていますが、必要なのは次の部分です。

    ...(略)...
    
    # Database administrative login by Unix domain socket
    local   all             postgres                                peer
    
    ...(略)...
    
    local   all             all                                     peer
    
    ...(略)...
    
    host    all             all             127.0.0.1/32            md5
    
    ...(略)...

    ここで “peer” となっているのが peer authentication です。これをパスワード認証にするには password または md5 とします。password は平文通信されるので、ハッシュ化される md5 を選びましょう。

    各設定はそれぞれ次のような意味です。

    local   all             postgres                                peer

    ローカルシステム上のユーザが、ユーザ名 postgres を使った peer 認証で全てのデータベース(all)に接続できます。peer 認証なので、実質的にローカルシステムの postgres というユーザが、全てのデータベースに接続できるのと同じです。

    local   all             all                                     peer

    ローカルシステム上のユーザは誰でも(2 つ目の all) peer 認証で全てのデータベース(1 つ目の all) に接続できます。

    host    all             all             127.0.0.1/32            md5

    127.0.0.1(localhost) からの接続はパスワード認証(md5)されて、全てのユーザ(2 つ目の all) が全てのデータベース(1 つ目の all) に接続できます。

    “peer” を “md5″ に書換えて、ロールにパスワードを設定すれば完了です。”sudo system reload postgresql” などとして、設定を反映させるのを忘れないように。

    ユーザ(ロール)のパスワード設定

    postgres 等の権限があるユーザで psql に入り、ALTER ROLE または ALTER USER を使います。

    postgres=# ALTER ROLE role_name ENCRYPTED PASSWORD 'your_password';

    そのパスワード認証、必要ですか?

    ここまで書いておいて今更ですが、peer 認証の仕組み自体は、分離している PostgreSQL と OS の認証をできるだけ簡素にする、とても良い仕組みです。MariaDB でも同じ手法を用いているため、これからは(あるいはもう既に)この手法が主流になっていくのでしょう。

    これが問題になるのは外部、あるいはプログラムからのアクセスでしょう。それについては、デフォルトで 127.0.0.1(localhost) からのアクセスはパスワード認証(md5)に設定されているため、ロールにパスワードを設定するだけで事足ります。

    今回は Python から psycopg2 で接続するのが最終目的だったため、ロールにパスワードを設定するだけで要件は満たしました。慣れた手法を使いたくなりますが、それによって時代の潮流から外れるのは、後々になって自分の首を絞めることになることはわかっているので、できる限り避けたいと思っています。

    参考

  • Debian 9 Stretch で Docker のインストール

    Debian 9 Stretch で Docker のインストール

    Debian 9 Stretch に Docker をインストールして動作確認を行うまで。

    $ sudo apt update
    $ sudo apt-get install apt-transport-https ca-certificates curl gnupg2 software-properties-common
    $ curl -fsSL https://download.docker.com/linux/debian/gpg | sudo apt-key add -

    /etc/apt/sources.list に次の一行を追加する。

    deb [arch=amd64] https://download.docker.com/linux/debian $(lsb_release -cs) stable

    もう一度 apt update して更新を行ったあとにインストールを行います。

    $ sudo apt update
    $ sudo apt install docker-ce

    動作確認に hello-world の image を run してみます。

    $ sudo docker run hello-world
    Unable to find image 'hello-world:latest' locally
    latest: Pulling from library/hello-world
    d1725b59e92d: Pull complete
    Digest: sha256:0add3ace90ecb4adbf7777e9aacf18357296e799f81cabc9fde470971e499788
    Status: Downloaded newer image for hello-world:latest
    Hello from Docker!
    This message shows that your installation appears to be working correctly.
    To generate this message, Docker took the following steps:
    The Docker client contacted the Docker daemon.
    The Docker daemon pulled the "hello-world" image from the Docker Hub.
    (amd64)
    The Docker daemon created a new container from that image which runs the
    executable that produces the output you are currently reading.
    The Docker daemon streamed that output to the Docker client, which sent it
    to your terminal.
    To try something more ambitious, you can run an Ubuntu container with:
    $ docker run -it ubuntu bash
    Share images, automate workflows, and more with a free Docker ID:
    https://hub.docker.com/
    For more examples and ideas, visit:
    https://docs.docker.com/get-started/

    ローカルのイメージを表示

    $ sudo docker images
    REPOSITORY TAG IMAGE ID CREATED SIZE
    hello-world latest 4ab4c602aa5e 2 months ago 1.84kB

    動作中のコンテナを表示

    $ sudo docker ps
    CONTAINER ID IMAGE COMMAND CREATED STATUS PORTS NAMES

    全てのコンテナを表示

    $ sudo docker ps -a
    CONTAINER ID IMAGE COMMAND CREATED STATUS PORTS NAMES
    4d4807dccc3c hello-world "/hello" 8 minutes ago Exited (0) 8 minutes ago friendly_chandrasekhar

    コンテナの削除

    CONTAINER ID を指定します。

    $ sudo docker rm 4d4807dccc3c
    4d4807dccc3c

    ローカルのイメージを削除

    イメージの名前か IMAGE ID を指定します。

    $ sudo docker rmi hello-world
    $ sudo docker rmi 4ab4c602aa5e

    参考